Full Sail Partners Blog | Terri Agnew, CPA

Posts by Terri Agnew, CPA:

When to Consider Utilizing Revenue Generation in Deltek Vantagepoint

Posted by Terri Agnew, CPA on February 22, 2024

02-22-24 - Revenue Generation - Banner

Revenue Generation is a feature in Deltek Vantagepoint that allows a professional services firm to define how a project should calculate revenue. This process is not turned on “out of the box” as firms can choose if and how they would like to utilize this feature. Vantagepoint’s default revenue method is “B,” meaning revenue is recognized only when a project is billed. Although this method works well for projects invoiced monthly for time & materials incurred, it doesn’t always align with all project types.

Additionally, utilizing the “B” method can restrict a firm from invoicing throughout the month as generally all costs should be posted and then invoiced to properly match revenue and expenses. Billing all at the end of the month can create a backlog and delay month-end closing processes. Therefore, if your projects are not billed monthly, the billing doesn’t match how the project should recognize revenue, or you don’t want to hold up your close process until all invoicing is completed, your firm should consider utilizing Revenue Generation.

Pursue Revenue Generation Methods

After deciding that revenue generation is right for your professional services firm, the next step is to decide on the revenue method(s) to be utilized for your projects. Revenue generation is flexible in the fact that methods can be different on different levels of a project’s work breakdown structure. Furthermore, your firm can create custom revenue methods if you feel one of Deltek Vantagepoint’s predefined methods doesn’t suit your needs.

Deltek Vantagepoint’s Standard Predefined Methods

The three most popular predefined methods are the Work In Progress (W), the Percent Complete Method (P), and the Multiplier (M) methods. See below the formulas and a brief discussion of when firms may choose to utilize these methods.

Work in Progress Method (W)

Job-to-Date Revenue = Job-to-Date Billings + Work-in-Progress @ Billing

Deltek Vantagepoint recognizes revenue as job-to-date billed plus work-in-progress at billing rates. This method works well for projects normally termed “hourly” or “time and materials.” One of the great features of this method is you can invoice anytime during the month and expenses posted after the invoice will still be recognized for that month and this method will match revenue and expenses. One disadvantage of this method is the formula has no limit set so if your project is “hourly to a max,” this method will not stop at the “max.”

Percent Complete Method (P)

Job-to-Date Revenue = (Percent Complete*Fee) + Job-to-Date Reimbursable Expenses

This method recognizes revenue based on a percent complete entered on the project times the compensation on the project, plus reimbursable expenses. This method does require the percent complete field to be entered, usually at the lowest level of the project where the revenue is to be recognized. The good news is there are several places to update this field – in Dashboards, in the Revenue Generation action bar, and the Project Review area. The bad news is that it does require updates regularly.

In general, this method works well when projects have milestone billings, often called “lump sum contracts” or “fixed fee” projects. On these types of projects, you may have a billing schedule that does not match your level of effort in a month. For example, if your milestones state that you can’t invoice until you have hit 25% complete, but this month you have completed 15%, you may want to recognize 15% now and not wait until you hit 25%. In this case, the percent complete field would need to be entered as 15%. In summary, this method produces revenue based on the percent completed, not invoiced, but that percent does need to be entered into the system with some “manual intervention.”

Multiplier Method (M)

Job-to-Date Revenue = (Job-to-Date Direct Labor x Multiplier) + Job-to-Date Reimbursable Expenses

The Multiplier Method recognizes revenue based on labor incurred times a multiplier identified on the project in the “Multiplier/Amount” field. This method can be used on projects that are billed hourly or percent completion-based. Usually, when using this method, the multiplier is set once and reviewed periodically but does not need to be updated as frequently as the P method. The pro of this method is that it requires less maintenance than the P method, but the con is that it may not be as accurate. The multiplier is project-specific, which allows flexibility.

User Defined Revenue Methods

If the above methods don’t meet your professional services firm’s needs, Deltek Vantagepoint has the flexibility to create as many revenue methods as needed.

For example, if you would like to use an hourly method, like W, but would like to add a maximum amount to the calculation, there is a “Subject to Max” option that can be utilized in a formula. Likewise, if you would like to compare two formulas and have the system recognize revenue based on the “lessor of” the two calculations, that is also an option. There are many fields available to create a User Defined Calculation from project fields such as budget or compensation fields, from billing terms such as rates or Add-Ons, or even from User Defined Fields on a project.

Choosing the Best Revenue Generation Method(s) for Your Professional Services Firm

As you consider the possibilities of revenue generation within Deltek Vantagepoint, it's crucial to refine your approach to ensure it aligns with your firm's unique project management and financial tracking needs. The flexibility offered by Vantagepoint enables a tailored revenue recognition process that can significantly enhance your financial accuracy and project oversight. To effectively implement and benefit from this feature, consider the following:

  • Assess Project Requirements: Evaluate the specific needs of each project or project phase to select the most appropriate revenue generation method. This assessment should consider the billing schedule, project duration, and the nature of the work (e.g., hourly, fixed fee, or a combination).
  • Implement a Hybrid Approach: Don’t hesitate to employ multiple revenue generation methods within a single project where necessary. This flexibility can accommodate diverse billing arrangements and project work phases, ensuring revenue is recognized in the most accurate manner across your portfolio.
  • Create Your Own Calculations: Leverage the capability to create custom revenue calculations to address any specific challenges or goals your firm has. This customization can help in situations where predefined methods fall short, ensuring your revenue recognition practices precisely match your operational and financial strategies.
  • Document and Standardize: Establish clear documentation of your chosen revenue recognition methods and the rationale behind them. This documentation will serve as a valuable reference for your team and ensure consistency in application across projects.
  • Engage in Thorough Testing: Before fully integrating a new revenue generation method into your operations, conduct comprehensive testing. This testing should simulate various project scenarios to uncover any potential issues and ensure the method performs as expected under different conditions.
  • Review and Refine Regularly: Adopt an iterative approach to your revenue generation strategies. Regular reviews allow you to adjust methods as your firm evolves and as projects present new challenges or opportunities for financial management optimization.

By thoughtfully selecting and applying revenue generation methods, your professional services firm can achieve a higher level of financial clarity and project management efficiency. Deltek Vantagepoint’s flexibility not only accommodates a wide range of project types but also empowers your firm to adapt and thrive in the dynamic professional services landscape. Embrace the opportunity to fine-tune your revenue recognition processes, ensuring they fully support your firm's strategic goals and project delivery success.

Strategize and Optimize: Revenue Solutions in Deltek

Maximize your Deltek Vantagepoint's Revenue Generation capabilities with Full Sail Partners' Navigational Analysis. Our service streamlines your processes, ensuring your ERP system aligns perfectly with your business objectives. From an initial assessment to a customized action plan, we guide your firm through optimizing system functionality to enhance operational efficiency and financial performance. Elevate your firm's potential—discover how our Navigational Analysis can transform your Deltek setup for optimal success by clicking the image below.

 New Call-to-action

The How-To Guide for Understanding Capacity Calculations in Deltek Vantagepoint Resource Management

Posted by Terri Agnew, CPA on September 28, 2023

9-28-23_ResourceMgmt Views - Banner

Using the Resource View in Deltek Vantagepoint is a quick and easy tool for project-based firms to determine which employees are properly scheduled or utilized, and/or those who may not have enough or too many hours planned. This view has a lot of valuable information on one screen and can sometimes seem a bit overwhelming. So, the content provided here in this blog, which is utilized with Resource Planning licensing, will assist you with the questions like “What do the blue/red/grey colors mean?” or “How is the utilization % calculated” and help make this form one of the most important tools in your firm’s resource management toolbox.  

Three Show Capacity Views 

There are three different options to monitor your resources: Planned Hours, Scheduled %, and Utilization %. Below you will find illustrations showing how these three views are calculated for you to better understand the information Resource View is displaying. 

Planned Hours 

Planned Hours is the simplest of the calculations as it is what it says it is – all planned hours! Use this view to simply check each selected resource's total planned hours for the time period shown in the Forecast Range. Planned hours will be shown for all published plans for ALL types of projects – overhead, promotional, and regular projects. Planned hours will show even if the project is showing a capacity calculation of excluded from scheduled and utilized % on the project’s summary pane. 

ResourceMgmt_01

Scheduled %

When you change the view from Planned Hours to Scheduled %, you will notice the “heat map” will appear. This “heat map” is used to visually draw a user’s attention to which resources are properly scheduled (grey), under scheduled (blue), or over scheduled (red) based on the firm’s chosen thresholds (Settings > Resource Planning > Resource Settings). 

ResourceMgmt_02

The Scheduled % is a calculation of Planned Hours divided by Available Hours for the resource. This view is great to use to get an understanding of if a resource is too busy (red) or has availability to be assigned to more projects (blue) or if they are appropriately scheduled during the timeframe (grey). 

  • Planned Hours - this calculation will include all types of projects (regular, promotional, & overhead). However, if a project shows as “Excluded from Scheduled and Utilization” on the Project’s Summary tab, those planned hours will not be used in this calculation. Note that excluded hours will still show the hours when the details are expanded for the resource. 
  • Available Hours - these are calculated using the employee’s standard hours from their employee hub, less any non-workdays as indicated in Settings > Resource Planning > non-Workdays. 

In the example shown below, I will break down the calculation for the week of 9/4 – 9/10 where Amy Allen is showing over scheduled at 138%. 

Planned Hours / Available Hours = Scheduled %      =     44 / 32 = 138% 

Planned Hours = 59 total hours planned less 15 hours for Greenhouse Café Remodel as that project is currently set to “Exclude from Scheduled and Utilization” in the project. The numerator is 59 -15 = 44 hours. 

*Note when you click on the blue link of each project, a small summary box for the project will appear where you can easily see if a project is “included” or “excluded” from Scheduled and Utilization. 

ResourceMgmt_03

Available Hours – Amy Allen’s standard hours are set as 8 hours per day in her employee hub, which is typical for a full-time 40-hour/week employee. The week of 9/4 – 9/10 contains a Labor Day Holiday in the company’s non-workday settings. As discussed earlier, holiday hours are excluded from available hours. Therefore, the denominator is 40 – 8 = 32.  

 *Note that when you click on a resource’s name, the Employee Card will appear. On that employee card, you will find the Hours/Day in the bottom right of the Profile Tab. 

Now, the shading!  What is this heat map telling you?   

Understandably, being scheduled at 138% would seem to be over scheduled just because it is a relatively large number, but the system is compared to the firm’s Resource Planning Settings. In my demo database shown here, the blue shading indicates under scheduled as under 90%, and the red shading for over schedule when over 105%. Grey is “just right” of 90 – 105%, which this firm has indicated as appropriately scheduled.    

In summary, in my database, a full-time, 40-hour/week employee would show as properly scheduled (grey) if the scheduled hours are between 36 (90% x 40) and 42 hours, under-scheduled would be less than 36 hours (blue) and over scheduled as over 42 hours (red). 

Utilization %

The Utilization % will show the percentage of the planned hours for billable projects (regular/won projects) and those In Pursuit projects marked as “included in scheduled and utilization”. Use this view to show how an employee is tracking against their Target Utilization. Even if an employee is well scheduled, in the example above, if several of the projects are either overhead or In Pursuit and not included in scheduled and utilization, the employee may be shown as under-utilized.  

ResourceMgmt_04

Utilization % is a calculation of Total Billable Planned Hours divided by Available Hours (same calculation as above). 

Total Billable Planned Hours only includes regular projects, no promotional projects nor overhead projects. Regular projects will be all those in the Stage Step of Won and any In Pursuit that are “Included in Scheduled & Utilization” Capacity calculations. 

For this example, I will be showing the calculation for the week of 9/11 – 9/17 from the picture above. In this view, I am also showing a few additional columns in the middle grid that help demonstrate if a project is “billable” or not.   

As you can see, I have one project that is a Lead Stage – Greenhouse Café Remodel, and as discussed above, that project is Excluded from Scheduled and Utilization so those hours will not be included in the numerator. Additionally, there is one project that is overhead (no stage listed), which is PTO.   

Total Billable Planned Hours / Available Hours = Utilization %      =     22 / 40 = 55% 

Total Billable Planned Hours = 53 total hours planned less 15 hours for Greenhouse Café Remodel as that project is currently set to “Exclude from Scheduled and Utilization” in the project, less the PTO hours of 16. The numerator is 53 -31 = 22 hours. 

Available Hours (as stated above) are calculated using the employee’s standard hours from the employee hub, less any non-workdays. This week does not have a holiday and this employee’s standard hours are 8 hours/day so the Available Hours = 40. 

Shading for Utilization %: 

To understand the heat map for the Utilization %, the formula considers each employee’s Utilization Target, which is set in the Employee Hub. This employee, Amy Allen, has a Utilization Target of 75%. 

The threshold calculation is the Utilization % divided by the employee’s Utilization Target. 

For the week ending 9/17, Amy’s planned Utilization % is 55% divided by the target of 75% equals 73%. In my demo database shown here, the blue shading will be under-utilized if the utilization % is under 90%, red shading over 105%, and “just right” or grey is between 90 – 105%. Therefore, since Amy’s threshold calculation is 73%, she is showing blue as that is under-utilized in my database. 

Capacity Calculations Made Easy with Resource View 

So, in summary, the Resource View in Deltek Vantagepoint has a lot of valuable information on one screen. You can use it to navigate to three different views to understand (1) how many hours an employee has planned in total (Planned Hours), (2) if the employee is over/under scheduled (Scheduled %), and (3) if the employee is over/under utilized by simply navigating between the three options in “Show Capacity”. Project based firms should be making the most of the resource management tools available within Deltek Vantagepoint! To learn more about this feature and other Resource Management tools, please visit our webinars located here: Webinars for Project Manager Rockstars! 


 New call-to-action

6 Steps for Accurate Reporting in Deltek Vantagepoint

Posted by Terri Agnew, CPA on March 16, 2023

03-17 6 Steps Accurate Reporting Banner

As a “Power User” or Deltek Vantagepoint System Administrator, you will often get requests from users for information from the system. Project Managers may need revenue totals, labor spent compared to budgets, or planned versus actual data. Executives may want to understand key performance indicators (KPIs) such as utilization, and revenue compared to budget or cash balances.  

Each user has a variety of needs, and as a Power User, it is your job to interpret their requests and provide the users with the best report in the ideal format to assist them in making business decisions. This article will walk you through the 6 steps you should take to create an accurate report and reduce the need for multiple report iterations. Use these steps next time a user asks for a report! 

1. Understand the Question(s) the Report is Supposed to Answer  

When someone thinks they need some sort of data, often they just ask for the data itself like “Can you get me a project detail report for XYZ Project?” However, you don’t know what they want to use it for, or what question they are trying to answer by using the report, the report they are asking for may be the wrong solution for their actual need. They will then come back and ask for another report until they get the data, so they really need to answer their question(s) or solve their problem.   

If you get a generic request for a report, first stop and ask what they are looking to use it for. Ask questions like: 

  • What is the issue you are trying to solve with the report?  
  • What data point(s) are you looking for – actuals, budgets, contract/compensation, revenue, profit, etc.?  
  • Do you need transactional details vs. just summary totals? What timeframe are you looking for (current month, YTD, JTD)?  
  • Which projects/records do they need?  
  • What output do you want it in?  
  • Is this data you need on a regular basis, and if so, at what interval? Based on this question, maybe they need a scheduled report or even a Dashpart instead.  

All these questions will help you give the user the data they are looking for, and hopefully eliminate revisions needed if you hadn’t asked the questions upfront. 

2. Decide on Deltek Vantagepoint Standard Report Base to Utilize 

Based on the questions asked, you will then need to decide what Vantagepoint Standard Report to utilize as the base of the report. Here is an example of how to go through some of the questions: 

Question: Tell me a little about what you are trying to use this report for. What question or issue is it to help you answer? Answer: I have a project that isn’t performing as well as I thought it should; the profit margin is low. I’m trying to figure out what phase of the project is going “south.” 

Question: OK, what specific data points are you looking for? Answer: Project Actuals compared to Compensation and Budget by phase. If you don’t know if their budget is from the plan or project budget worksheet, you would need to verify this data point. 

Question: Do you need transactional detail or summary totals? Answer: Summary totals will work. OK, I’m now leaning toward the Project Earnings or Project Progress report, not a Project Detail report.   

Question: What timeframe(s) do you need the data for? Answer: JTD will work.    

Question: Since you said you need to compare to your budget; do you want to see the overall budget amount or ETC and EAC? Answer: Good question; I’d like to see JTD, ETC, and EAC.   

As you can see, you start building the report as the questions get clarified. In fact, their initial request for a Project Detail report may have been entirely inaccurate for what they truly need this report for. 

3. Select the Records Needed 

In the example I have been using, the user was asking about one project. However, often you need to verify which records you need. After you have clarified that, I recommend selecting your records first. This recommendation is for two reasons: (1) record selection is at the top of the screen, so why not fill it in first? and (2) when I am done selecting my options, I want to run the report right away. If I don’t select the records first, I may accidentally run the report for ALL records…YIKES, No thanks!   

4. Review the Options Needed 

With Deltek Vantagepoint, the reporting options menu is now consolidated to two tabs – Columns & Groups and Options. On occasion, you may want a chart or to change the layout but for the most part, these first two tabs are all you need. Since the options are condensed, the best practice is to start at the top and hit all of them. This way you won’t miss something like selecting final totals, the correct budget option, or if you needed to uncheck the “activity” option. 

5. Preview for Accuracy 

ALWAYS! Prior to giving a user a report, even if it is a report that you have used many times, always preview the report first. Missing one little box, like not unchecking the activity box, will result in a blank report. Preview the report. Make sure it answers the question in the first step. Are all the data points needed represented? Are the records correct? 

6. Confirm the Output 

The most popular type of output for a report is a PDF or physical printout. However, there are many other options available. Deltek Vantagepoint can export reports to Excel, Word, and even PowerPoint. Additionally, now that Vantagepoint has dynamic dashparts, many firms are finding that when a user is asking for a report, they may find it useful to create a dashpart to have on-demand access to this information quickly and easily.   

Once you are satisfied with the report, contact the user with output options and confirm the best output. Sometimes after you present the draft report to the user, you may find that this is a report that should be scheduled out on a regular basis or shared with a group of individuals’ favorite report list. Or maybe a dashpart would be useful to access the information on a regular “on demand” basis? 

You may also want to ask questions like “Is this information something you would like on your projects weekly, monthly, on-demand?" or “Is this information something you feel other managers also could use on a regular basis?”  

Accurate Reporting With Deltek Vantagepoint Allows for More Efficient Decision-Making 

In conclusion, accurate reporting is essential for making informed business decisions in Deltek Vantagepoint. As a Power User or System Administrator, it is crucial to understand the user's needs and interpret their requests to provide them with the best report in the ideal format. By following the six steps outlined in this article, you can create accurate reports that answer the user's questions, reduce the need for multiple report iterations, and eliminate the possibility of errors. Always preview the report before sharing it with the user and confirm the output options that suit their needs. Accurate reporting in Deltek Vantagepoint is vital to help your organization make informed decisions and improve overall business efficiency. 


New call-to-action

Going Paperless with Deltek Vantagepoint

Posted by Terri Agnew, CPA on January 12, 2023
2023_Going Paperless with DVP_BannerAs we kick off the New Year, many people make resolutions. Some people create personal resolutions like exercising more or saving money for a vacation and some create professional resolutions such as striving for a promotion. Many firms also set organizational resolutions, usually called goals. Common goals are to improve profitability or implement more efficient processes. One goal that can both improve profitability and create efficiencies in an organization is to go paperless in your accounting department.   

Does your firm have a goal to go paperless? Going paperless or at least striving to significantly reduce paper in your organization can benefit a firm in the following ways: 

  • Cost reductions – One obvious item is the reduced expense of the paper itself, but other items could include a reduction of printer ink, file folders, file cabinets, and storage rental to save records. If going paperless includes paying vendors by EFT, as discussed below, the expense reduction can also include the cost of check stock, envelopes, and postage to mail checks.   
  • Efficiencies gained – Many firms spend time printing reports, invoices, and checks and then have to manage to distribute these items and sometimes track that items have been returned. Eliminating printing these items and allowing the system to “manage the distribution” will streamline the process.   

Here are some examples of how Deltek Vantagepoint can help you get your firm to go paperless! 

Utilize Deltek’s AP Approval Process  

One of the first tools you can utilize to assist your firm in going paperless is to implement the AP Approval process. If your firm is currently routing invoices around the office in a file folder and tracking which invoices are “out for approval,” the AP approval will significantly help your firm! The AP Approval process allows firms to approve consultant or trade invoices within the system based on your firm’s approval philosophy. The approval workflow is very flexible, meaning you can route invoices based on a variety of options such as the vendor, project being charged, purchase order criteria if used, or to a specific employee. The workflow can also have multiple steps, such as having secondary approvals based on the dollar amount of the voucher.   

The first step of the AP Approval process is to attach the invoice electronically to the voucher. Therefore, it is recommended that the firm requests all invoices be sent to an email box, eliminating paper invoices even coming in the door! The system will track which step each approval is at, at any given time, so your AP staff will not have to track which invoices have been approved or which ones they need to track down. The AP Approval process is the first step to getting the accounts payable process to be paperless. 

DVP_Paperless_01 rev

Pay Vendors by ACH/EFT 

Paying vendors electronically by ACH/EFT is the most efficient method of payment processing. Electronic payments will eliminate the need for check stock, envelopes, copies of checks, and file cabinets for storage, not to mention adding efficiency to the payment process.  It is best practice to request banking information as well as a contact to email the payment remittance from all vendors. This information is then saved in the Vendor Hub. When processing payments, no checks or check copies will need to be printed. Instead of mailing the check and remittance to the vendor, the system can email the remittance to the email address entered in the Vendor Hub. The EFT file can then be saved directly from the payment screen and uploaded to your bank.   

If your current process is to print checks, print check copies, attach invoice backup to checks, sign checks, mail checks, and file the backup in file cabinets then implementing electronic AP payments will significantly reduce the time needed for your AP payment processing. Your new process would be something like this:

  • Process automatic payment run,
  • Email remittances to vendors,
  • Process EFT file, and
  • Upload to the bank website. 

Easy and fast!  

There are some “pro-check people” that say they like to physically sign a paper check to ensure the invoice and payment are accurate and they want to see all the approvals. The answer to that is to first put in place the AP Approval process as mentioned above, and if the check signer would like to approve the actual invoices, that person could be a step in the AP Approval workflow. Additionally, the “former” check signer can review the payments through the Payment Review screen prior to uploading the ACH/EFT file to the bank. The Payment Review screen will allow the approver to see each payment made, click on the vouchers, and drill into Voucher Review to view the documents and approvals as they wish. 

DVP_Paperless_02-rev

Implement Billing Approval Process  

Another process that allows firms to go paperless is to implement the Billing Approval process to invoice your clients. Many firms print draft invoices and give them to the PM or Principals to markup and approve by passing around folders. How long has the PM had to approve the invoices? Who has not given the biller the folder back? Did they give the biller all the draft invoices back that were in the folder, to begin with? Stop this manual process and start using the Billing Approval process in the system  

The Billing Approval process allows firms to route the invoice to the approver within the Deltek Vantagepoint system, markup and approve the invoice electronically and route the invoice back to the biller for final review. The biller will always know which invoices are approved or still “in process.” There is also a report that can be produced to show how many days it took from the submittal of the invoice to final approval. Additionally, Deltek Vantagepoint has the ability to email the client the invoice directly from the system, so the invoice never has to be printed.   

How much paper would your firm save by not printing any draft invoices month after month!?!  It could be reams of paper, so it adds up fast! 

DVP_Paperless_03-rev

Consider Going Paperless as a Goal for New Year  

After you close out 2022, evaluate your firm’s 2023 goals. Consider adding “Going Paperless” to your 2023 agenda and utilizing some of these tools. Not only will you reduce paper, but your processes will also be more efficient! Cheers to a successful and profitable 2023! 

New call-to-action

More Features of Deltek Vantagepoint 5.0

Posted by Terri Agnew, CPA on July 27, 2022


2022-DVP More Features-01

In a previous blog, we discussed many of the amazing features of Deltek 5.0. However, there are even more features of Deltek Vantagepoint 5.0 available to include new mobile capabilities and ways to manage contacts. Here we will review those additional features and see the improvements made particularly in resource planning. 


Multiple Rows in Labor Grid for Resource Planning 

This enhancement provides more parity to the Deltek Vision Resource Planning. With this enhancement, users can change the view of the resource plan itself. The project manager can add multiple sub rows (as shown below) to the labor grid in planning. Choices include: 

Note: The Resource Planning Module is required for this feature. 

Graphical user interface, application, table

Description automatically generated

The ability to be able to change this view and select sub-row settings is set up on a global level. The firm can decide what’s allowed in Resource Planning Settings. Meaning if the firm doesn’t want to use baseline, for instance, this sub-row could be turned off in Settings.   

Add Assignments Under Inactive Levels in Resource Planning 

This new feature allows firms to add resource or generic assignments to inactive project levels and their respective “child row” if it’s not dormant. The dormant levels will remain closed for adding resources and their respective “child rows” and will keep the “no add” icon.  

Firms do not need to have the Resource Planning module to take advantage of this new feature. 

Graphical user interface, application

Description automatically generated 

Expanded Resource View in Resource Management 

In Deltek Vantagepoint 5.0, users can search for resources with additional field options inside Resource View. This feature does require the Resource Planning module.  

The additional fields that are now available in Resource View are any standard drop-down or look-up fields in the Employee Hub as well as any user-defined drop-down or look-up fields.  

Controlling which fields are allowed is a Global option that is configured in the Resource Planning settings. However, Hub Security is not honored. So, for example, if a user doesn’t have access to the Travel Preferences field in the Employee Hub, but it’s made available in Resource View, that user will be able to see that information.  

undefined-Jul-13-2022-11-22-02-90-PM

New Projects Filter and Expanded Column Options in Resource Management 

In Resource View, users now have the ability to filter projects at the very top of the grid itself. There are several options to filter the projects including: 

  • Project status
  • Charge type
  • Project manager
  • Project organization
  • Stage
  • Stage step
  • Probability 

Note: The Resource Planning Module is required for this feature. 

Graphical user interface

Description automatically generated

Mobile Enhancements 

There have been enhancements to both the CRM and Time & Expense (T&E) mobile apps in Deltek Vantagepoint 5.0. Those enhancements include: 

  • Business card scanner – A contact can be created by snapping a photo of a business card in the CRM app. The contact will be created with the data from the card using ICR (Intelligent Character Recognition) makes entering contacts on the fly even easier.  
  • Updated Login Assistance – Both the T&E and CRM apps now have a new “forgot password” assistance button.  
  • Enter time and dates using the keypad – Stop the endless scrolling with this new feature! Users of both the T&E and CRM apps now can enter the time or date using the keypad.  

Pipeline Dashpart Enhanced 

In the pipeline dashpart, firms now have the ability to show the pipeline forecast based on the method of the project, only spread evenly across the timescale. It also introduces the Revenue Forecast values.  

Note: Both resource planning and CRM modules are required. 

Graphical user interface, application, table, Excel

Description automatically generated 

My Upcoming Assignments Dashpart 

It is strongly recommended to add the “My Upcoming Assignments” dashpart to each employee’s dashboard if the firm uses Resource Management. If the employee is planned on any project, that employee can automatically see what assignments they have upcoming using this dashpart.  

The employee can see the upcoming assignments in three different views – by planning hours, scheduled %, or utilization %. The employee can also change the forecast range from the next four weeks and up to 20 weeks into the future.  

This dashpart acts as a mini resource management view for the employee to see including the “Heat Map” features.  

Note: The Resource Planning Module is required for this feature. 

  Calendar

Description automatically generated with medium confidence


Utilize More New Features in Deltek Vantagepoint 5.0 

Who knew how many features would now be available with this newest version of Vantagepoint? The mobile enhancements and resource planning features in Deltek Vantagepoint 5.0 now enable even more efficiency in the system. Why wait, start using them now! 

Click the button below to see how Deltek Vantagepoint can support your project-based firm. 


Harness the power of VantagePoint

What’s New in Deltek Vantagepoint 5.0

Posted by Terri Agnew, CPA on July 13, 2022

2022-DVP What is New

From project managers to accountants to business developers, almost every role at project-based firms will benefit from the new features in Deltek Vantagepoint 5.0. The new features go beyond usability enhancements like drill-down capabilities for dashboards to entirely new ways to manage timesheets. Let’s take a look at some of these new features of Deltek Vantagepoint 5.0.

Search Navigation Improvements

The search navigation bar for top-level searches has been redesigned. Users can now find any record without needing to select a search criterion such as “active.” This is different than in Vantagepoint 4.5 when a user wanted to find a record. Deltek has revamped the new search navigation to be closer to how the Quick Search function was in Vision.

A new filtering option was added as shown below to the right of the search field. Users can filter by the saved searches. A user can select a saved search, and a preview of the project records meeting those criteria is displayed. From this view, a user can either select multiple projects, or all projects can be selected by clicking “Done.”

To learn more about the redesign of the search improvements, watch this mini-demo.

Saved Searches

Saved Grid Views

Another general enhancement is the ability to save grid views. If records are displayed in a list view, as shown below, the order and type of columns displayed can be saved. Then users can toggle between different views based on their preferences.

saved Grid Views

The types of views that can be saved are:

  • Columns selected in the grid
  • Order of the columns selected
  • Column width
  • Pinned columns

Saved grid views are currently available in:

  • Hub records in list view
  • Edit Project Structure grid
  • Transaction Center lists
  • Transaction Entry grids such as AP vouchers
  • Interactive billing grids

Saving grid views has been added to the “Save Rights” section with Reports, Search & Options in User Security. These security settings allow for users to save grid views for themselves, their role, or globally.

See how grid views are saved in an upcoming mini demo in September. Check this page to sign up when it’s available.

My Preferences Option

The next general enhancement is in the My Preferences area. There is a new feature that was added at the bottom right of the My Preference box (shown below).

Users can now decide how they want the General Ledger accounts to be sorted – by account name or account number. This is going to be helpful for those people who enter GL accounts, such as the accounts payable professionals. It’s helpful when that user is in the transaction area because they now can search lists sorted by account name or account number.

My Preferences

Sorting of Timesheet Line Items

This enhancement has been highly requested and it’s finally in Deltek Vantagepoint 5.0. It was a feature in Vision, but not only did Deltek bring it back, but it greatly improved the functionality. Now employees will be able to sort their timesheet line entries by project name, client name, and project number or have no sort at all. No sorting will leave the timesheet lines in the order in which they are entered on the timesheet.

When there are multiple lines for the same project, they will be sorted by Phase, Tasks, and then Labor Code (as applicable).

In addition, when the employee adds a new timesheet line item, the timesheet will automatically sort based on the sort option chosen.

Timesheet sort options

Timesheet and Floor Check – User Options

Another efficiency enhancement with timesheets is the ability to sort or see employees by first, last name, employee name or period ending. This is especially helpful for those approvers who have many employees to approve. This is available in both the timesheets and floor check.

Timesheet sort options - user

Expanded Use of Accounting Email Templates

Vantagepoint 5.0 has expanded the use of the email templates, specifically for interactive billing, draft invoice approvals, and in the invoice history area. Users can create invoice templates and save them to use again.

Sharing saved templates is controlled by Role Security under the “Save Rights” section. Users can preformat any of the email items including the To, CC, subject line, and body message. Fields can also be inserted into the subject line and body of the email to make it more personalized.

Accounting email templates

Billing Clients Can Change Over the Project Lifecycle

Vantagepoint 5.0 now allows for the billing client to change over the project lifecycle and maintain its invoicing history. Now, when a billing client is changed on the accounting tab in the Projects Hub, it’s updated on the Team and Invoices tabs.

In addition, the history of the billing client at the time of any previous invoice remains the same. This means if a previous invoice needs to be reprinted, the initial original billing client will stay intact. Any detail reports, dashboard statements, etc. are also going to now retain the history of whatever the billing client was.

Other Accounting Updates

The other accounting updates in Deltek Vantagepoint 5.0 include:

  • The automatic bank feed is available for on-premise clients. This allows the firm to import transactions from a bank directly to reconciliation. Cloud clients had this ability beginning in Vantagepoint 4.5.
  • Automatic creation of cash receipts from bank reconciliation imported receipts that are not already entered. However, posting is not yet supported directly from bank reconciliation.
  • The integration between Vantagepoint and Corpay (previously Nvoicepay). This simplifies and automates payments to the vendors. The integration processes payments in Vantagepoint and sends the file to Corpay to issue the payment. It does require initial onboarding with Corpay, a 3rd party application.

AR Detail Base Dashpart Update

This is another great enhancement to Deltek Vantagepoint 5.0. While previous versions of Vantagepoint had the AR Detail Base dashpart, this latest version has added the AR Comments column. Not only does this column show the latest comments, but it gives the ability to add new comments directly from the dashboard.

AR detail base dashpart

Other Dashboard Enhancements

Other enhancements to Vantagepoint dashboards are listed below.

  • New feature to schedule daily dashpart updates. This reduces the need to have “always rebuild” checked on the dashpart.
  • The calculated fields on dashparts now support date ranges!

Start Using These New Features in Deltek Vantagepoint 5.0

The new features in Deltek Vantagepoint 5.0 touched nearly all of the areas of the system. From usability enhancements for dashboards to entirely new ways to manage timesheets, many improvements have been made. Start using these new features today! Additionally, be on the lookout for the next blog regarding more 5.0 enhancements pertaining to resource planning and CRM.

Click the button below to see how Deltek Vantagepoint can support your project-based firm.


Harness the power of VantagePoint

A Few of My Favorite Things About Deltek Vantagepoint Reporting

Posted by Terri Agnew, CPA on April 06, 2022

2022 - Vantagepoint Favorite Things-01-1

In my prior experience as a Controller of Architecture and Engineering (A&E) firms, I was often the “go-to” person for creating reports for PMs and Executives using Deltek Vision. Over time, I learned exactly which tab(s) the options were on for the various reports, which navigation menu item to choose to find the report base I needed, and even which color names were my favorites to use for the group headings.  Now with Deltek Vantagepoint, report creation has been made even easier with a few excellent enhancements. So, with the musical the Sound of Music in mind, let’s highlight the Deltek Vantagepoint report upgrades as “A few of my favorite things” …about reporting!  Feel free to “sing” along. 

Favorite Thing #1 - Organization of Reporting Menu

My first “favorite thing” may not be as pretty as “raindrops on roses” but it sure will save time!  Unlike Deltek Vision, Vantagepoint has only one Reporting option on the Navigation menu. All the standard base reports are now found on one “Reports” tab within Reporting. Likewise, all Saved Global/Personal reports will be listed on one “Favorites” tab. Instead of navigating through a dozen + menu items to find the report needed, now simply search for the report by name on either tab or filter by the type of report if you choose.    

For example:  Don’t scroll through the full list searching for the Time Analysis Report. Using the name of the report, start typing “time” in the search bar and “voila”, the report will populate.   

Fav_Things-01

Just even knowing the type of report rather than the name of the report, it can be filtered based on report type and list just those reports. This filter is like navigating the reporting menu tree in Vision.  

Fav_Things-02

Favorite Thing #2 – No more than 4 Option Tabs!   

Unlike the many “whiskers on kittens”, there are no more than four tabs to review for reporting options.  In Deltek Vision, some reports had two tabs, and some had up to seven! In Deltek Vantagepoint, at most there are only four tabs. 

Fav_Things-03

Columns & Groups:   Always start by deciding how the report should be grouped/sorted and which columns are wanted on the report. Keep in mind the headings of the columns can still be changed just like as in Deltek Vision but now there is only one header, not a header line 1 and line 2.   

Options:  This tab contains all “other” options for the report selected. Time selections, activity options, budget options, financial detail options – if the report has the option, this is where to find them all!  Having all the options consolidated to one tab makes it easier when creating a report as the user can simply skim through the options available from top to bottom.  There is no need to go from tab to tab any longer! 

Chart:  Not all reports have the ability to utilize charts, so this tab is not always an option. However, if the report data makes sense to also be shown in a bar, pie or line chart, this is the tab to set it up. 

Layout:  This is the tab with the choice to override the report defaults for report layout (portrait vs landscape), paper size, font, borders, headings & footers.  Advanced tip:  If a user has special options for a report, consider adding the options selected as a note in the footer for a reference as needed. 

Favorite Thing #3 – Easy Searching for Columns & Groups  

My third “favorite thing” is how easy the column and group options can now be selected in Deltek Vantagepoint. This may seem basic but having one quick and easy selection area is as satisfying as some “crisp apple strudels” with my coffee. 

Does the user want to know part or all of the name of the column or to add YTD data columns only? Does the user want all columns for hours? Use the filter! It will save time as there is no need to scroll through the long list of column options. 

Fav_Things-04
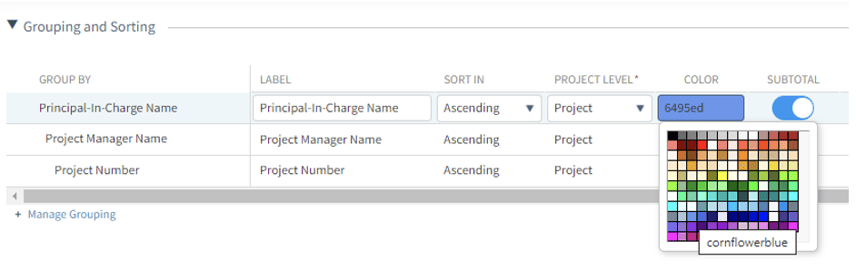
Favorite Thing #4 – Colors for Grouping & Headers, now Actual Colors not Words!!   

Let’s face it, sometimes data is boring and can be hard to read if there is too much of it on one page!  Adding some color to grouping labels can help the eye focus in on a particular detail.  The new color selections in groupings & headers are related to my favorite thing #2Want a blue like “blue satin sashes”? In Deltek Vision, to figure out if that blue was cornflower blue or light steel blue, the user had to select the color by name, preview the report and decide if it was the color desired. Now the color selection actually shows the true color visually! 

Fav_Things-05

Another great place to use colors to brighten up a report is in the Column Heading. This option can be found on the “Layout” tab of reporting. Use a nice bright color to liven up what used to be a basic black & white report. Better yet… does the firm have an approved color palette? Find out the color codes for the firm’s colors and type in the code of the color to use in reports. Now reports will match the company branding. The user doesn’t have to be limited to the 140 colors shown in this grid. Here is a website that shows more color options:  Color Hex Color Codes (color-hex.com). Select a favorite color or the company’s brand color to liven up those reports! 

Favorite Thing #5 – Select Report Options, Records and Save the Report - All from One Screen! 

My last favorite thing about Deltek Vantagepoint reporting reminds me of “brown paper packages tied up with strings”. Deltek took three areas from Vision reporting and combined them to one page. In Deltek Vision, users had to go to one screen for Options, go back to the main reporting page and navigate to a second screen for the records selection, navigate again to the main reporting page and go to a third screen to save the favorite report. In Deltek Vantagepoint, all three of these reporting functions are executed from this main reporting screen! 

Fav_Things-06

Two more quick reporting tips… (1) don’t miss that the report title can be changed directly from this screen as well! Simply click on “Project Earnings” and rename this report to whatever makes sense for the organization.  (2) Users can also email the report directly from this main screen from the “Other Actions” options. 

Enjoy the Enhancements of Deltek Vantagepoint 

While Deltek Vantagepoint users cannot all sing with the voice of Julie Andrews in the Sound of Music, they can certainly benefit from this list of “my favorite things.” In fact, users may discover more to add to this list! In the meantime, let these Deltek Vantagepoint enhancements make reporting a lot easier because like Maria said when feeling sad, “I simply remember my favorite things and then I don’t feel so bad.”   


Click the image below to learn how to add the powerful, feature-rich ERP to your toolbox and get your team working on the same page of the same book.

New call-to-action

Solve Common Problems with Deltek Vantagepoint AP Voucher Lookup

Posted by Terri Agnew, CPA on September 01, 2021

For accounting professionals, the AP voucher is the single source of truth for tracking supplier invoices. An AP voucher has information from a supplier like the firm amount that is due, terms for payment, signatures of authorized firm representatives, and more. Keeping this information up to date and correct is critical, however, errors and other changes do occur.

  • Is there an invoice that was accidentally entered twice and one needs to be voided/reversed one?
  • Was tax, shipping or another amount missing on an invoice and now it is already posted?
  • Is an entered invoice amount incorrect and need to be corrected?

AP Voucher Review image

If this sounds familiar, it’s because these are all common issues that come up in the AP world. Typically, AP associates will enter a new voucher to correct these items and then reverse or add/subtract to the value of an original invoice. By doing this, two vouchers are entered for the same invoice number, often by adding a letter or number to the original invoice number. When the invoice is paid, the associate needs to remember to select both vouchers to pay the entire correct amount of the invoice. In the case of a duplicate invoice, there isn’t a “void voucher” option like there is void check or void client invoices.

However, there is a better solution - utilize “Voucher Lookup” to edit an AP voucher easily & smoothly!

Using Deltek Vantagepoint AP Voucher Lookup

Once an AP Voucher is posted Deltek Vantagepoint, it isn’t very evident that there is an option to edit the voucher. But there is! Voucher lookup is a great tool that is not as widely used as it should be.

When using AP Voucher lookup, Vantagepoint “attaches” the new voucher detail lines to the original voucher by utilizing the same voucher number and voucher header. When the corrected voucher is attached to the original there won’t be two vouchers for the same invoice to reconcile in vendor review or select in payment processing! As a result, vendor records are kept clean!

Examples of Deltek Vantagepoint AP Voucher Lookup:

Issue 1: Whoops! Two vouchers were entered for the same invoice and one of them needs to be reversed.

Deltek Vantagepoint AP Voucher Tips Solution: Enter a new AP transaction, use voucher lookup, and reverse the original lines. This AP entry will be linked or “attached” to the original voucher, not creating a new voucher but editing the original, making a zero-dollar total invoice. The steps are as follows:

  1. Go to Transaction Center > Transaction Entry > AP Vouchers. Either start a new batch (if using batches) or a new transaction (if using single transaction posting).
  2. Select the vendor. Don’t enter the rest of the header data!
  3. Go to the top right under “Other Actions” and select “Voucher Lookup”.
    1. A list of the vouchers for this vendor will appear.
    2. Select the original voucher for the invoice that needs to be edited.
    3. In the top of the list there is a search box that can be used to find an amount, voucher or invoice number and it will search for any matches from the existing vouchers.
  4. Next, select the voucher that requires editing. The voucher header information will populate from the original voucher… this is where the linking comes in.
  5. At this point, anything entered in the voucher details below will add to the original voucher line items. If the original entry had three lines and another it added, four lines will appear in the voucher review.
  6. In this example, the original voucher needs to be reversed entirely.
    1. To reverse lines, go back to “Other Actions”, select “Copy/Reverse Lines”.
    2. Check the box in the top header row to select all voucher detail lines.
    3. Click “Reverse All”.
    4. This selection will bring these lines into the voucher detail as a negative, using the same project coding. Which is simple, FAST, and does not require re-keying of line items!
    AP Voucher 2
  7. Post voucher as usual.
  8. In voucher review, the original line items and the additional link items entered during the Voucher Lookup will appear.
  9. In this example, the overall voucher is now zero and the total lines in the voucher are 12.

Deltek Vantagepoint AP Voucher Tips

Issue 2: Need to add an additional line for tax, shipping or other charges missed on original entry?

Solution: Do all steps from above, except line 6, don’t use the Copy/Reverse function. Simply add the lines needed to add to the voucher detail. Any lines that are added will link/attach to the original voucher and add/subtract to the original voucher amount.

Issue 3: Need to correct an amount in the original voucher?

Solution: Do everything above, including Copy/Reversing Lines. It is suggested to reverse the line(s) that were entered incorrectly and then enter the correct amount so there is a good audit trail. After reversing the line(s) that were entered in error, add the correct lines in the same voucher. Every line that is reversed and/or add will still link/attach to the original voucher and add/subtract to the original voucher amount.

Solve Common Accounting Challenges with Deltek Vantagepoint

Deltek Vantagepoint does more than making AP voucher corrections easy. Need to bill a client interest on a past due invoice? Check out this mini demonstration to learn how and make sure to explore all the free Vantagepoint content available on the Full Sail Partners’ website. Additionally, Full Sail Partners is dedicated to the success of its clients. Use the image link below to contact Full Sail Partners with questions about Vantagepoint.

Reach Full Sail Partners


Latest Posts